9 Reasons Your Marshmallow Cookies Turned Into A Sticky Mess
So you go to make some marshmallow cookies, dreaming of that perfect gooey marshmallow pull that reminds you of days amongst fireflies by the campfire toasting up a s’more, but instead of getting that lovely pull apart awesomeness, you end up with disappearing marshmallows and flat cookies.


Trying to mashup a cookie with marshmallow presents its own set of unique baking challenges, and I’m here to help you fix them.
In the process of creating my marshmallow crispy cookies, I made a batch with my students. The marshmallows disappeared completely and turned into a disastrous batch of sticky cookies that stuck aggressively to my parchment and were fragile and flatter than just about anything. My normally enthusiastic students politely nibbled their cookies and said no words. People, if you’ve worked with 1st-3rd graders, this is not normal!
In thinking through what went wrong, I realized that my initial tests for these cookies were with slightly stale marshmallows. Why would stale marshmallows give you a better cookie than fresh? I dehydrated 6 bags of marshmallows just so that I could help you understand how to make the perfect marshmallow cookie.

The 2 Underlying Reasons Marshmallows in a Cookie Cause Issues
Marshmallows Melt Far Too Rapidly

Marshmallows start melting at about 95 F, which is far under the blasted heat of a 350 F oven most cookies are baked at.
Because of this, marshmallows can melt long before a cookie is finished baking. In Rice Krispie treats, we both intentionally melt the marshmallows and are adding them to a mix that contains no extra cookie matrix. In a Rice Krispie treat, marshmallows are free to be the glue that holds things together since there is no other structure in it like there is in a cookie.
Marshmallows Contain Too Much Water
It’s not you, it’s water that’s causing structural problems in your marshmallow cookies. Marshmallows are comprised of 3 things: sugar, air, and water. When marshmallows hit the heat of the oven, they rapidly expand and collapse. You’ve seen this this if you’ve ever microwaved a Peep or toasted a marshmallow over the campfire.
The problem is that when there’s too much water in that mix, as the marshmallows expand, they break up the structure of a cookie, turning into melted lava that could potentially burn, cause holes in the cookie and other problems.
We’ll talk more about water later, but the TLDR is: Starting with dehydrated marshmallows changes everything.
9 Problems Marshmallows Cause When You Add Them to Cookies
1. Flat Cookies

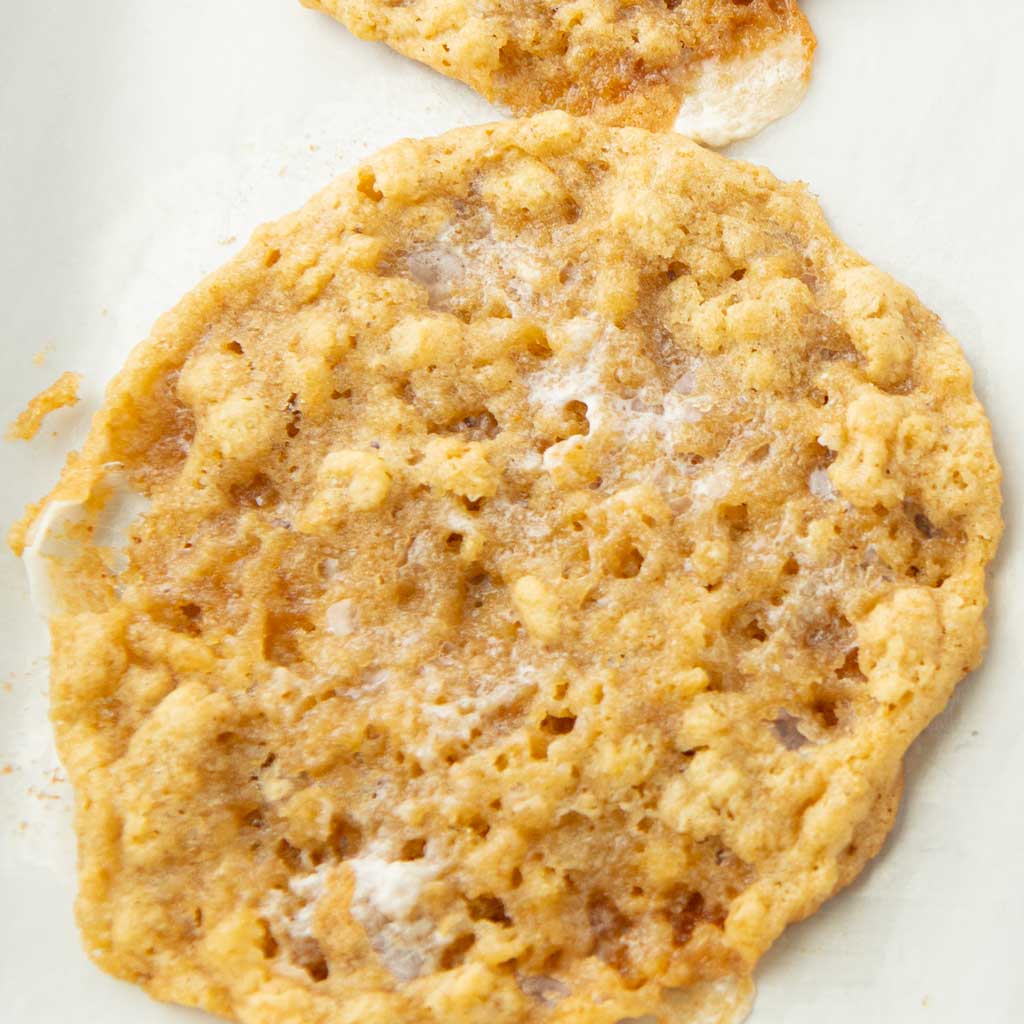
When you add marshmallows to a cookie, the marshmallows begin to melt quickly. They expand with air which collapses after baking. As this happens, the cookie matrix gets diluted, pushing out the outside rims of the cookie, leaving you with a cookie that is flatter than Kansas.
These flat cookies are weirdly structurally weak too, falling apart easily after the cookies are completely cooled.
2. Sticking to the Pan
If a fresh marshmallow leaks out the bottom of a cookie, it can literally glue the finished cookie to your sheet pan, even if you’re using parchment .
Using a silicone baking mat helps significantly, but it won’t solve the underlying problems of rapid melting and too much water in the marshmallows to begin with.

3. Storage Nightmares
Because sugar makes moisture migrate to the surface of a baked good, a fresh marshmallow can make already sticky cookies even more sticky after a day of storage.
Definitely always store marshmallow cookies with layers of parchment in between!
4. Burnt Marshmallows
The first time I added marshmallows to cookies, it was in a batch of s’mores brownies. The marshmallows, being on top of the cookie, exposed to the direct heat, burnt so badly, we smoked out the kitchen!
Keeping your marshmallows mixed up inside the cookie or wrapped in the cookie dough as they are in marshmallow crispy cookies keeps the marshmallows from burning as they won’t be exposed to the direct heat of the oven.
5. Holes In the Cookies
Since marshmallows melt so quickly at high temperatures, you can be left with actual holes in the middle of your cookies. This is a purposeful phenomenon if you’ve ever made Resurrection Rolls.
When I was testing my S’mores Cookies, one marshmallow melted so completely, I had a perfect cookie donut!
6. Uneven Browning
Marshmallows in a cookie could melt into lovely pale brown toasted tops, equally nice molten white pools or miserable burnt messes.
Depending on how much direct heat a fresh marshmallow gets will determine that. Since we can’t really perfectly arrange marshmallows as they bake, dehydrating helps us control the melt.
7. Melting Into Puddles

This is by far my least favorite thing about marshmallows in cookies. What you’re hoping for is a partially melted but discernible marshmallow, but unfortunately, what more often happens is that you get a flat pool of goo that leaves your cookie with irregular edges.
A similar thing can happen with caramel candies in cookies like Monster Cookies.
8. Disappearing Marshmallows
Worse than flat marshmallow puddles are marshmallows that melt so quickly that they leave no trace of having been there to start with.
Disappearing marshmallows, if they don’t leave holes in the dough can leave you with none-too-cute translucent goo on your cookie.
9. Diluted Marshmallow Flavor and Texture
In the confusion of a marshmallow that melts completely, you can easily lose all the marshmallow taste and texture you love from a good s’more or Rice Krispie Treat.
By now, you may be thinking, it’s plum near impossible to make these dumb little marshmallows work in cookies. Dear baker, keep on reading because the solution is as simple as it is weird.
The One Simple Trick That Solves All the Marshmallow Problems
When the marshmallows are slightly dried, there is an outer skin around the soft inside. This makes the marshmallow melt slower, giving the cookie enough time for its structure to set before the marshmallow melts completely. Also, there is no longer enough moisture in a dried marshmallow to break up the cookie’s structure.
Dehydrating marshmallows fixes the melting problem and the too much water problem by:
- Creating a skin on the outside of the marshmallow: This tough marshmallow if you want to think of it like this will take more energy to melt. By the time a dehydrated marshmallow is warm enough to melt, the cookie will be done or close to done. No holes, no disappearing marshmallows here!
- Keeping less free water in the mix: With less free water to create steam inside the cookie, there will be less water to break the cookie’s structure.
How to Dehydrate Marshmallows for Cookies
Testing doneness: In all cases, marshmallows are done when they have a crusty outer shell with a kernel of gummy softness you can feel when you squeeze a marshmallow. If they’re so hard that they shatter, they may not melt well inside a cookie.
Handy Summary of Dehydrating Marshmallows
|
size of marshmallows |
Air drying |
Oven drying (170 F) |
Dehydrator (135 F) |
|
Miniature marshmallows |
8 hours |
2 hours 15 minutes |
3 hours |
|
Large marshmallows |
12-24 hours |
3 hours |
4 hours |
Drying Methods (3 Ways + a Clunker to Avoid)
I tested 3 primary ways of drying with my 6 bags of marshmallows plus a heatless method that was an unfortunate complete failure. All of them have advantages, but not everyone has every piece of equipment or time. So I scienced it all just for you complete with cookie tests to verify my times.
Air dry marshmallows
Air drying marshmallows is by far the most passive of all the methods. All you need to do is place marshmallows on a tray and set them somewhere safe like the top of a refrigerator or a bookcase. After 8-24 hours, they will be ready to go. You’ll know they’re ready when the outside it dry to the touch but you can still feel a kernel of gummy softness inside the crusty outside.
- Pros: You don’t need to pay attention here. Leave them alone, and they’ll dry out. This is the most forgiving method as its done slowly over many hours. Let them dry a little longer or shorter, and they’ll still be great.
- Cons: This will work less well in wetter climates, which, since I live in Colorado is basically everyone else. Also, this takes up space, so you need to have a free sheet tray you can leave out.
Oven dry marshmallows
To oven dry marshmallows, set them on a silicone baking mat in a sheet tray. Be sure that they do not touch. Set them on the lowest oven setting (170 F) for 3 hours for large marshmallows and 2 hours 15 minutes for miniature marshmallows. After 3 hours, cool them. They will seem hard on the outside, but they’re just right for baking.
- Pros: This is by far the quickest method.
- Cons: You need to rely on a timer here or risk over-drying the marshmallows. Many of the 4 hour extra large marshmallows I tested refused to melt. 3 hours seems to be the sweet spot. If the marshmallows aren’t spaced well, they will stick together, forcing you to cut them apart with either a knife or kitchen scissors .
Dehydrator marshmallows
To dry out marshmallows in a dehydrator, set marshmallows on small trays on a piece of parchment. Set the dehydrator for 135 F. Dry out the marshmallows for 4 hours for large marshmallows and 3 hours for miniature marshmallows.
- Pros: Most dehydrators will turn themselves off if you can program them for a time cycle. That makes this process so easy. You can also dry out a lot more marshmallows at a time. 135 F does not melt the bottoms of the marshmallows as easily as it does at 170 F in the oven, so the marshmallows stick less. Doing this process in the oven saves oven space, so it won’t interrupt any of your regular baking activities.
- Cons: Not everyone has a dehydrator, and if you do have one, you’re probably pulling it off a shelf (raises hand!), making this slightly less convenient.
Freezing marshmallows (don’t do this)
In theory it’s possible to freeze marshmallows before baking them. Doing so is highly convenient as all you need to do is toss a bag in the freezer. You would think that the cold marshmallows would take a little longer to melt, taking care of at least the melting problem.
In practice, frozen marshmallows defrost very very quickly, certainly not long enough to affect a positive outcome. Also, frozen marshmallows still have all the water in them, making for the same problems you get with fresh ones. You can see in the cookies above about 4 of the problems outlined in this article. Allrecipes tested this some time ago and found the same issues.
How Dehydrated Do My Marshmallows Need to Be (A Visual Comparison)

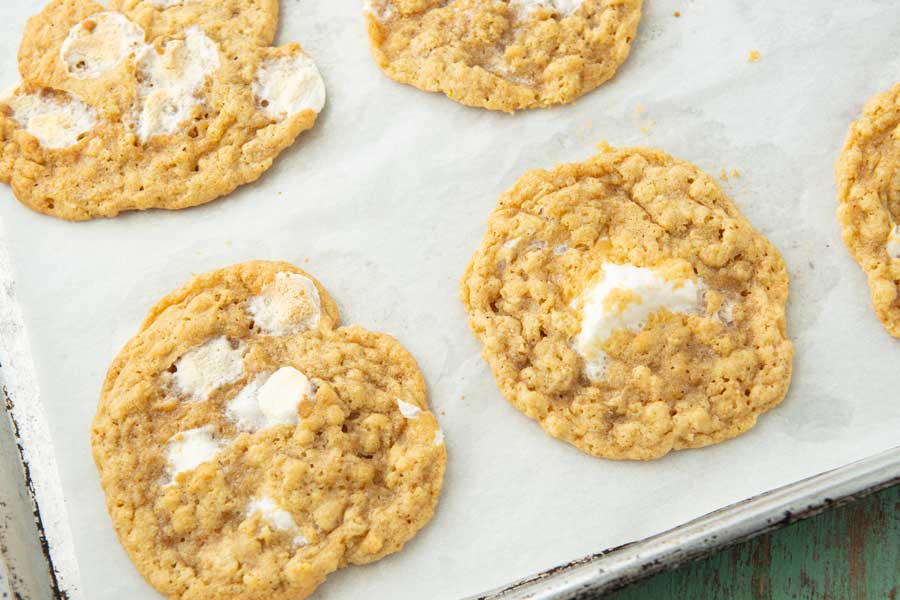
Fresh marshmallows: Not recommended as they melt completely out of the cookies, leaving the cookies flat and fragile.
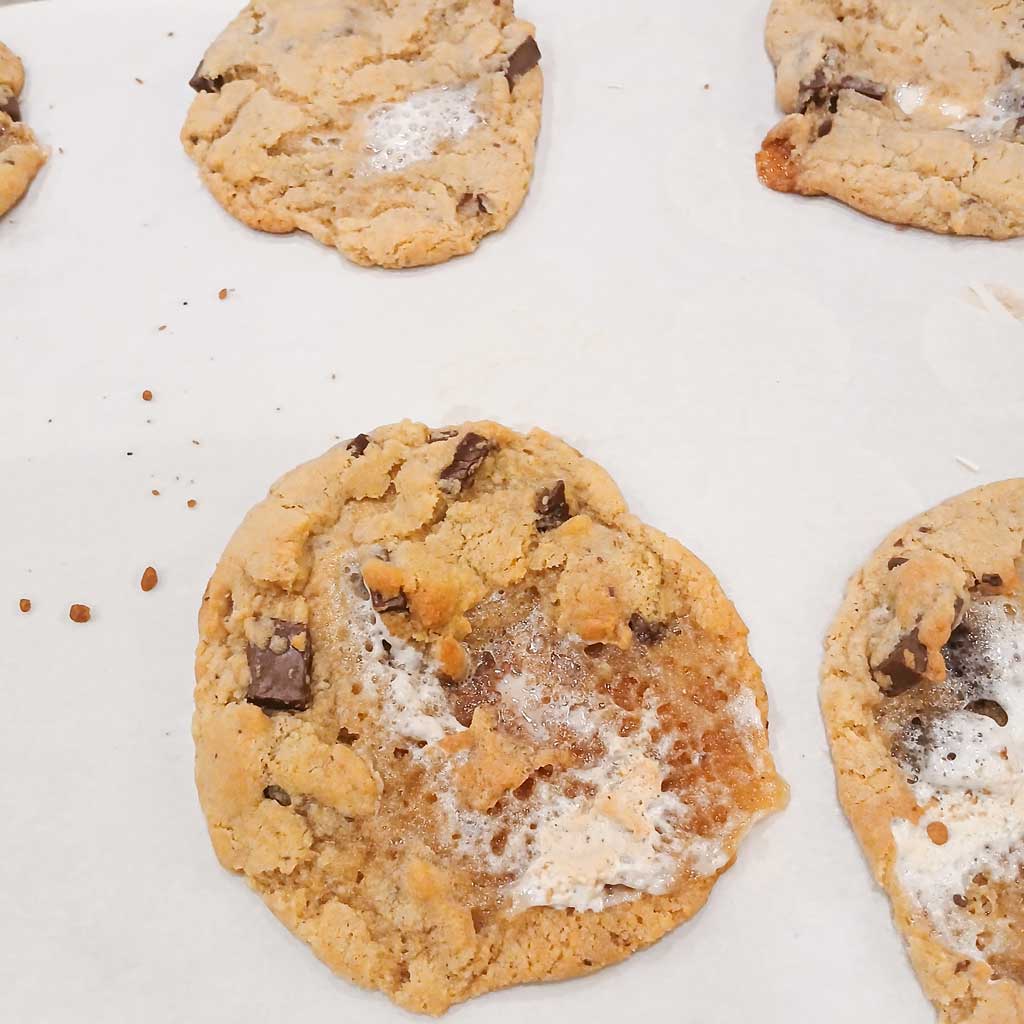
2 hour oven dried marshmallows: Cookies are holding their shape better, but still could be a little less flat. Solution: the marshmallows need a little more dry time.
2 hours 15 minute dehydrator marshmallows: The small marshmallows are doing pretty well at this time, though some of them have deflated unattractively. I think this has to do with the dehydrator drying at a lower temperature, so the interior takes more time to dry than it does in the oven. The big marshmallows are mostly holding their shape, though the cookies are flatter than I’d like (hence why I’m recommending 3 hours at 135 F for dehydrator big marshmallows).
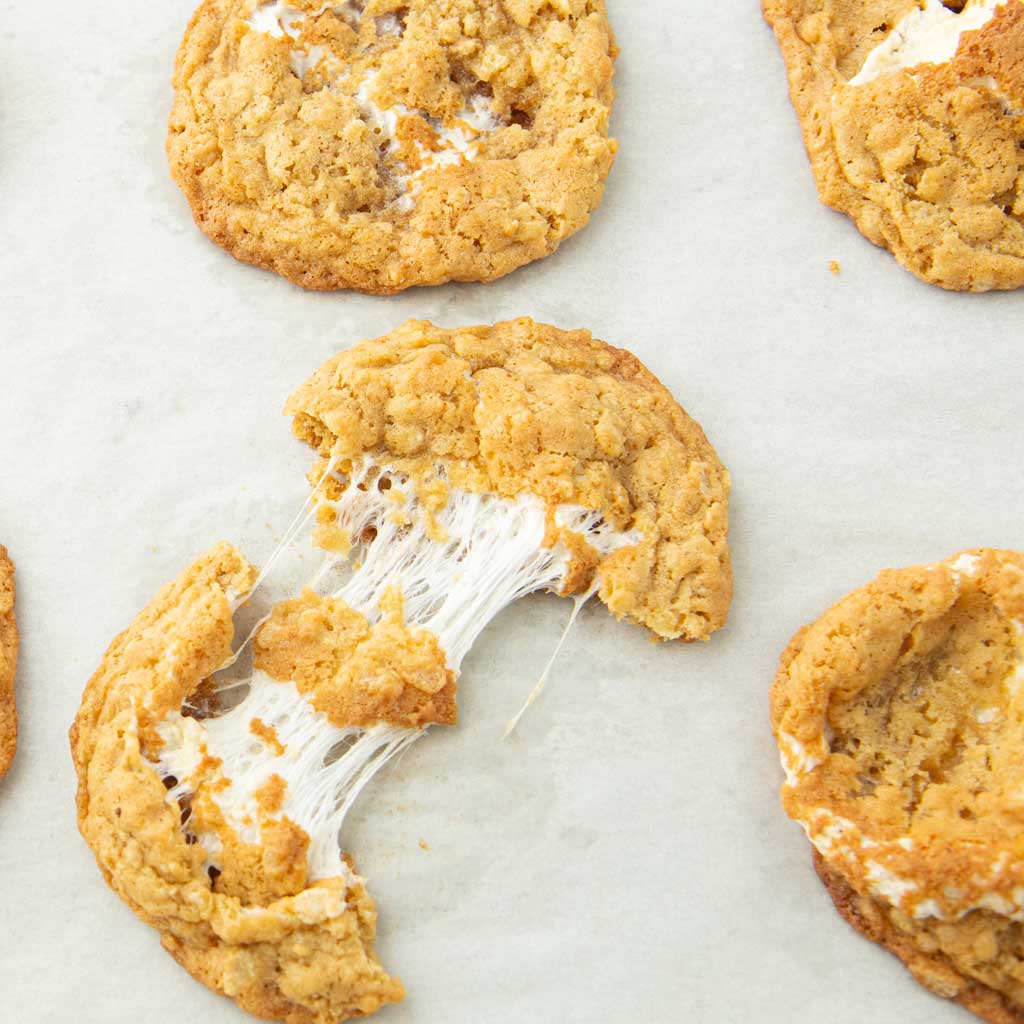
3 hour oven dried marshmallows: This is the clear winner. Cookies hold their shape, marshmallows stay bright white and create a perfect marshmallow pull when you open them. It’s hard to see, but the cookies to the right of the marshmallow pull cookie were 4 hour marshmallows, and the big marshmallows in them resisted melting and as such left weird hollows in the cookie matrix where the marshmallows weren’t–kind of like if you make your bed with a sweater under the covers.
Tips for Dehydrating Marshmallows

- Leave space!: Do not let the marshmallows touch or they will turn into weird stuck together marshmallow fractals. Do your best to spread them out on a silicone mat (ideal) or parchment that’s been sprayed with cooking spray.
- Let marshmallows cool when you test doneness: Warm marshmallows will seem much softer than they actually are. Let a marshmallow cool for a minute or so before you test to see how dehydrated they actually are.
- Use kitchen scissors : It’s likely you’ll have a few marshmallows that do get stuck together. If this happens, use a pair of kitchen scissors to cut between the marshmallows. They may be a little mangled looking, but it won’t change their performance in a cookie.
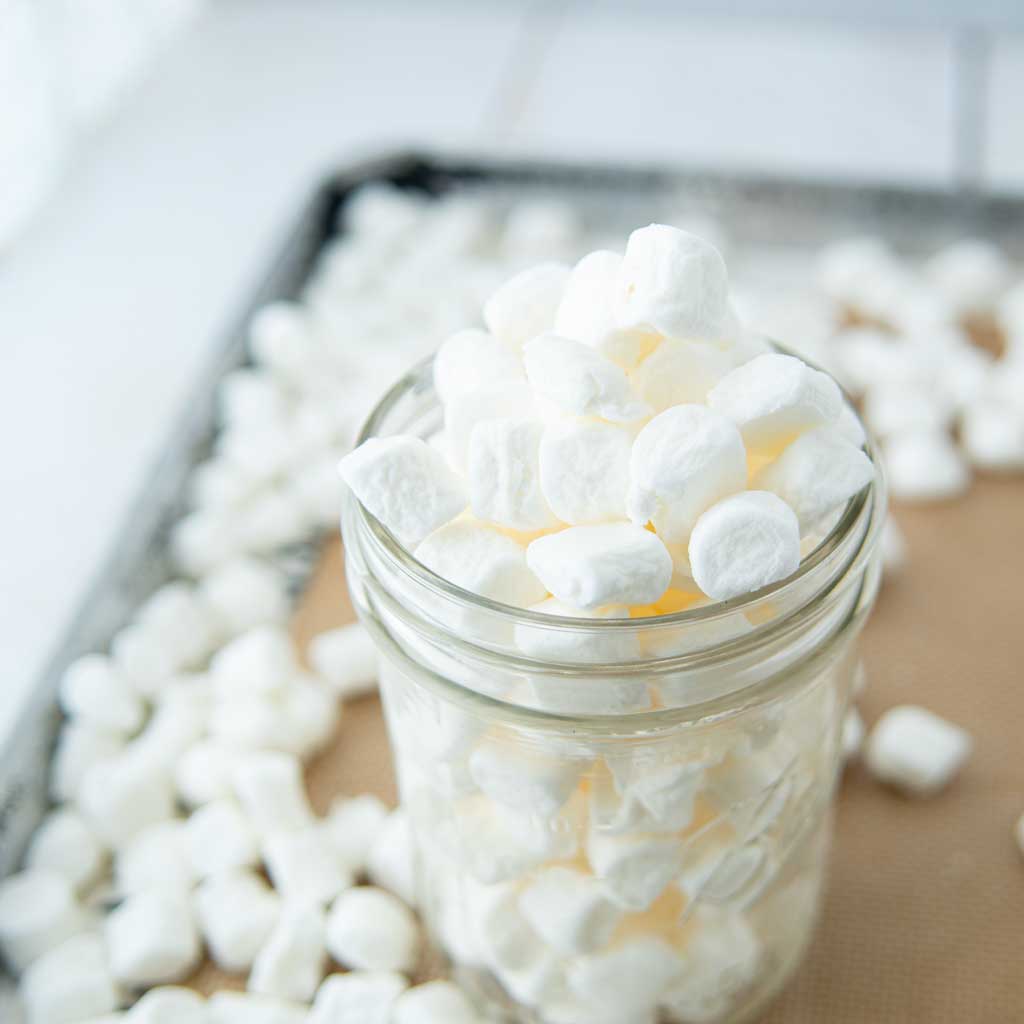
Storing Dehydrated Marshmallows
Store dehydrated marshmallows in a ziploc bag or a glass jar in your pantry. They will last as long as any other bag of marshmallows would last.
FAQ About Dehydrating Marshmallows
Sure, but you’ll end up with all the problems I outlined above. If you don’t want to spend time minding marshmallows in the oven, set them out to air dry for the simplest possible way.
Sure, but they’re many times more expensive that drying them yourself at home. These Hampton Dehydrated Marshmallows are $11.50/pound vs. like $2 for a bag of fresh marshmallows. The price difference should always lead you to DIY this situation. The one exception is marshmallows from cereal like Lucky Charms which are already dry. They will be more expensive in comparison, but sometimes you want the look of novelty marshmallows.
You can use them straight away after dehydrating or store them in ziploc bags for another day. Both work equally well.
Absolutely not. I purposely tested the oven, air drying, and my dehydrator on this recipe to prove that you do not need a dehydrator for this process. Please refer to the recipe for times or my handy summary table above.
On large marshmallows, there won’t be much difference between a 12 hour marshmallow and a 24; most of the drying happens in those first 12 hours. As such, if you forget about your marshmallows, nothing bad will happen. Air-drying is the most forgiving of the drying methods.
Cookie Recipes With Dehydrated Marshmallows

Marshmallow Recap for Intrepid Readers
If you’ve made it this far, you’re probably my people! Just know that if you’ve struggled with getting marshmallows to create that perfect marshmallow pull with lovely bright white pools of gooey stretchiness, it’s not you, it’s the water in the marshmallows.
Getting rid of that water through dehydration is the secret to getting lovely marshmallow cookies that will be best sellers at the next church bake sale.
Whether you air dry, oven dry, or use a dehydrator to dry your marshmallows into submission, they’ll be perfect for using for these marshmallow cookies:
Print
Dehydrated Marshmallows
- Total Time: up to 24 hours
- Yield: as many marshmallows as you want to make
Description
Getting rid of most of the moisture in packaged marshmallows is the key to getting marshmallows that bake into gooey stretchy cookies without ruining your cookies.
Ingredients
- 10 ounce bag of mini marshmallows
- 12 ounce bag of large marshmallows
- Cooking spray (if using parchment)
Equipment:
- sheet trays
- silicone baking mat
- parchment (if not using a silicone baking mat)
- dehydrator (optional, below)
Instructions
Setting up the marshmallows
- If using parchment, place it in a sheet tray and spritz the parchment with a little cooking spray.
- If using a silicone baking mat, place it in your sheet tray.
- For a dehydrator, either line dehydrator trays with parchment or line sheet trays that fit in your dehydrator with parchment (I can use 1/4 sheet pans in mine).
- Place the marshmallows on the tray, doing your best to keep the marshmallows from touching each other.


Choose your drying method
- Air dry: Set your marshmallows on top of a refrigerator or another undisturbed place like the top of a bookcase. Dry miniature marshmallows for 8 hours and large marshmallows for 12-24 hours.
- Dehydrator: Set your dehydrator for 135 F (57 C). Dry miniature marshmallows for 3 hours and large marshmallows for 4 hours.
- Oven: Set your oven for the lowest possible setting of 170 F (77 C). Dry miniature marshmallows for 2 hours, 15 minutes and large marshmallows for 3 hours.
Marshmallow Dehydrating Times Table

Storing dehydrated marshmallows
- Let all marshmallows cool completely before sealing in ziploc bags for storage. Dehydrated marshmallows will keep in the pantry as long as you would keep a bag of fresh marshmallows.
- Prep Time: 5 minutes
- Cook Time: a few hours
- Category: Baking Building Blocks
- Method: Oven
- Cuisine: American