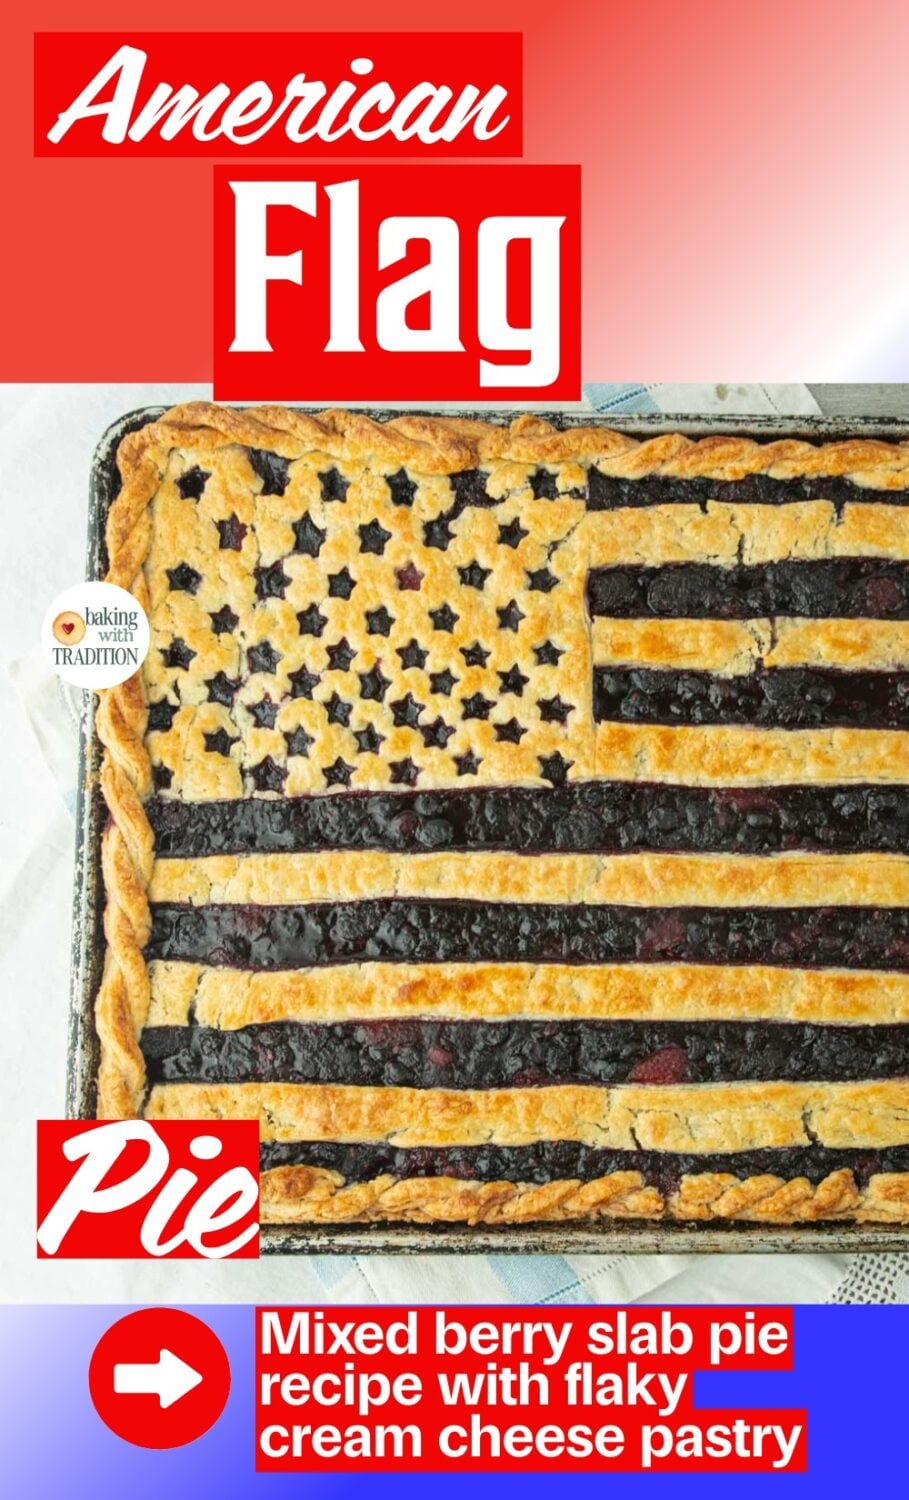
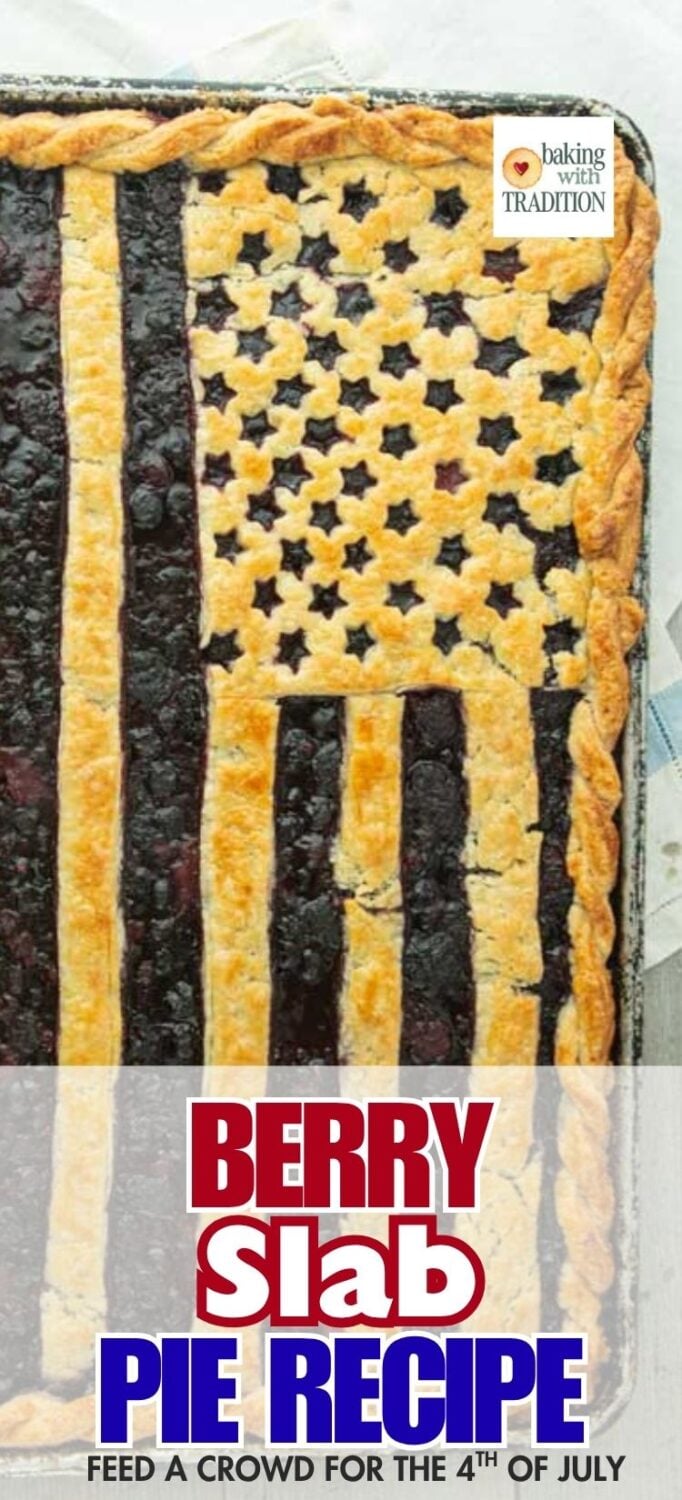
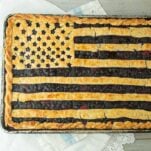
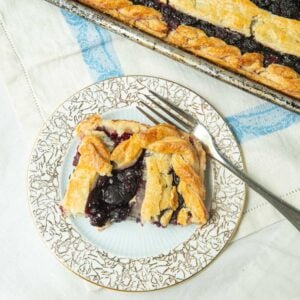
American Flag Slab Pie: Mixed berries make it easy to serve a crowd
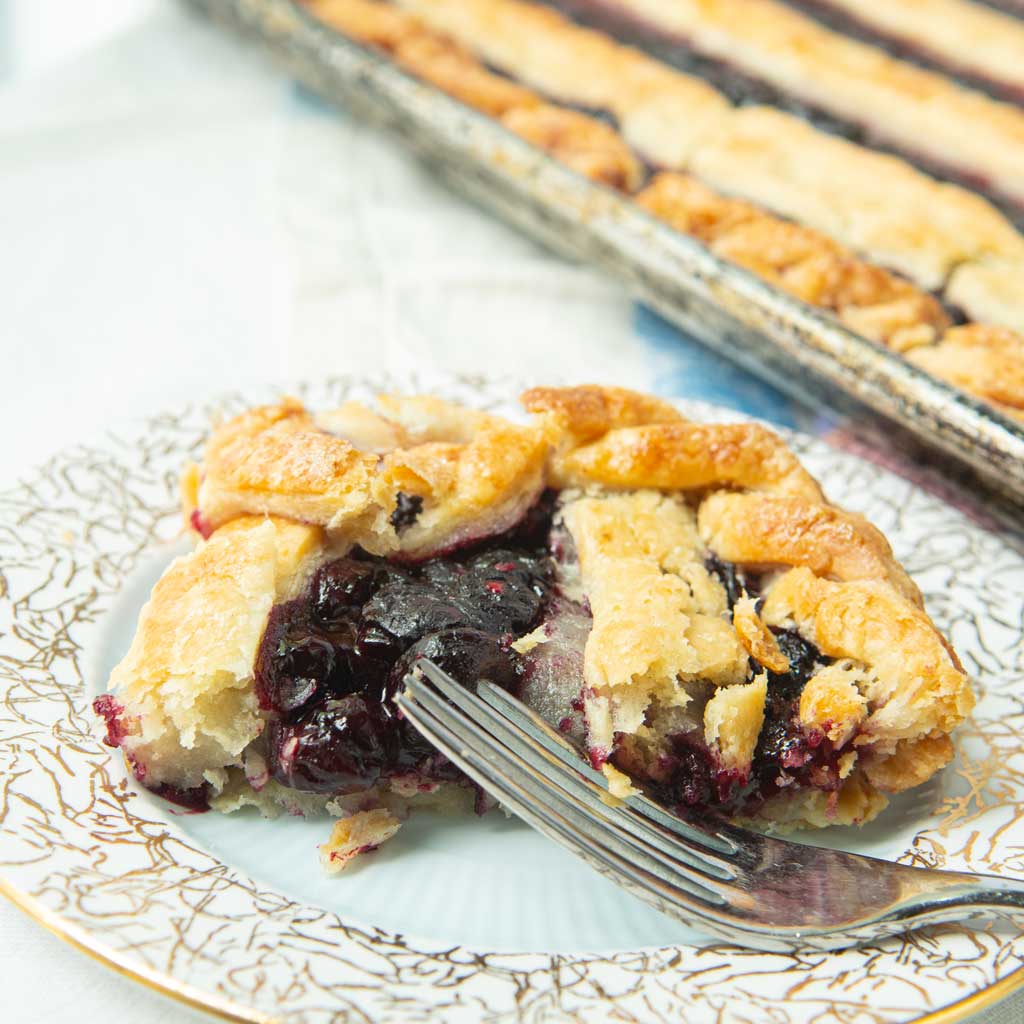
This American Flag slab pie has it all: mixed berry filling with a showstopper top crust cut to look the flag, and a braided edge of perfect flaky cream cheese pastry to gild the lily.
Show up to a backyard BBQ this 4th of July with this beauty, and you’ll want to start singing. It’s a showstopper worthy of all the fireworks!
| Taste | Texture |
| Bright berries, not too sweet | Flaky, jammy |
| Active time | Total time | Yield | Difficulty |
| 45 min | 2 hrs 20 minutes | 20 slices | Medium |

Why you’ll love making Flag Pie
- So pretty: There’s nothing difficult here, but prepping the top crust takes a little time. Listen to some good music, and in a little while you’ll put one of the prettiest things you’ve ever made into the oven. It is so worth the effort. I seriously got to the end and started singing the anthem just to see if my kids would hear me.
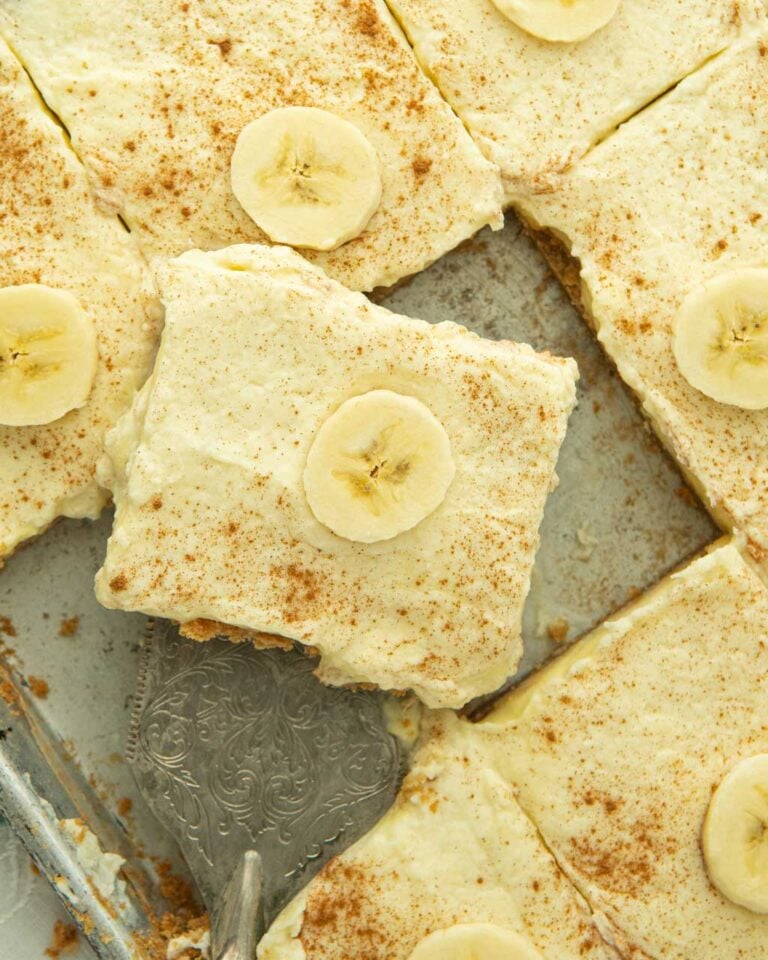
- Feeds a crowd: Slab pies are so practical. Like banana pudding pie you can show up to a party with a pie like this and feed everyone in the place. The sheet tray makes for easy transportation too. Pop on a sheet pan cover or foil, and it’s sitting on someone’s lap for the car ride without worry of an incident.
- Not too sweet: I purposely keep all my fruit pies on the less sweet side because I want them to taste like the FRUIT. Here the good floral and slightly tart berries play off the tanginess of the cream cheese pastry. My, it’s good.
- Convenience: While this pie screams Summer, you really can make it any time of year because of the awesomeness of frozen berries. Frozen berries take out all the work of this pie and they’re so consistently good. I don’t know about your family, but a bag of frozen berries is always in our Costco cart.
Ingredients for Flag Slab Pie
Cream Cheese Pastry
- Butter
- Cream cheese
- Flour
Mixed berry filling
- Mixed berries, frozen or fresh
- Granulated sugar
- All-purpose flour
- Lemon juice
- Chai spice blend or ground cinnamon
Finishing the pie
- Egg
- Granulated sugar for sprinkling
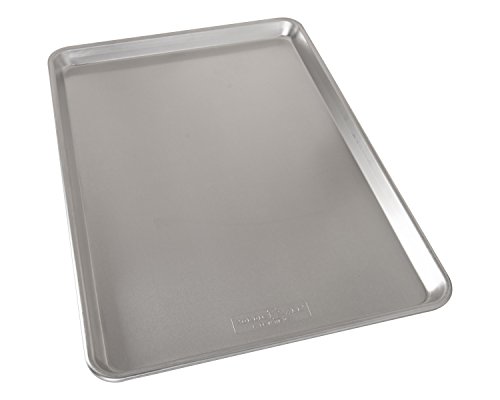
Equipment needed
- 1/2 sheet pan
- Parchment (precut 1/2 size sheets are so helpful here, but use what you have)
- Rolling pin
- Star cookie cutter (I’m using one from a set of micro fondant cutters), but use what you have
- Paring knife
- Pastry brush
- Ruler + pencil
Extra good things to make to go with your slab pie
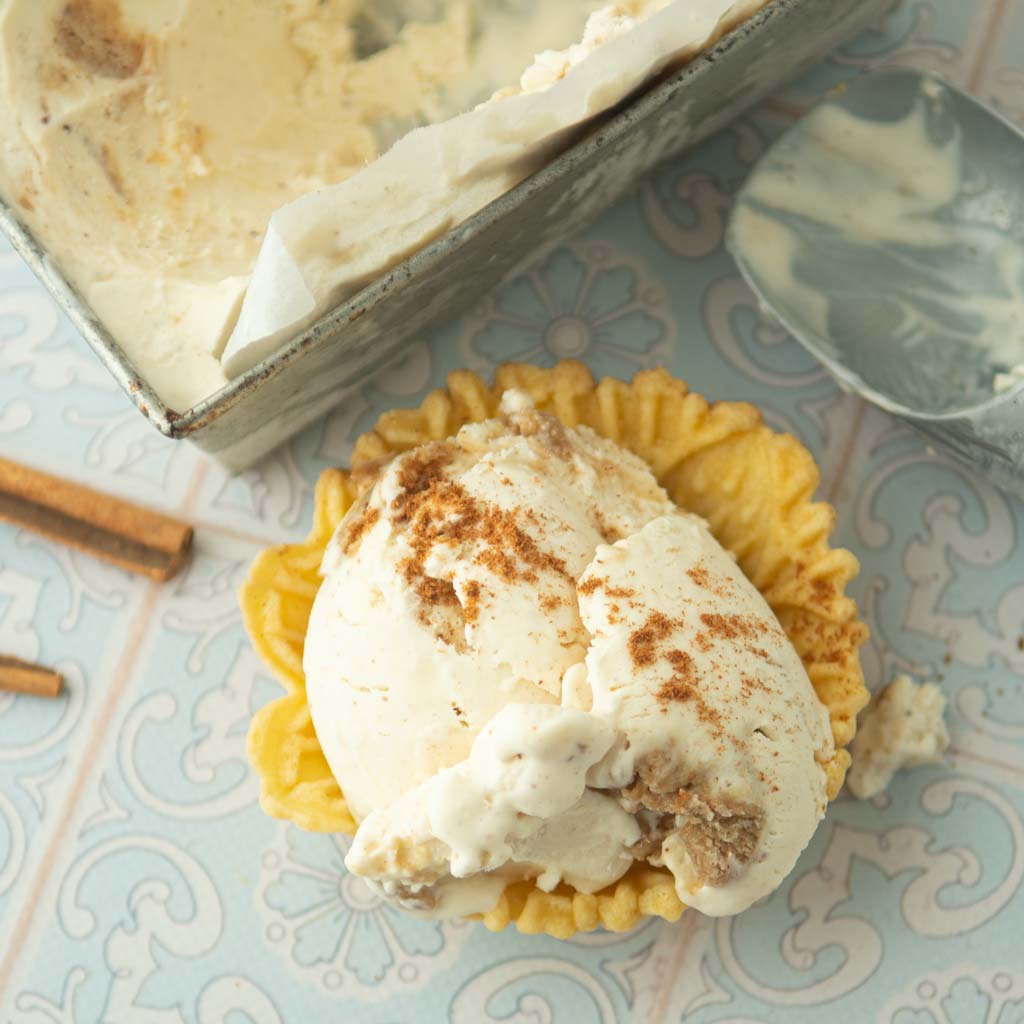

This is a pie for ice cream! My kids know better than to ask me for ice cream to go with apple strudel or cake, which is nearly heretical in my eyes. But pie? Pie + ice cream = happy. Here are all my ice cream recipes that’ll be best with this particular flag pie:
- Cinnamon Ice Cream: the easiest and best. This ice cream goes with practically everything.
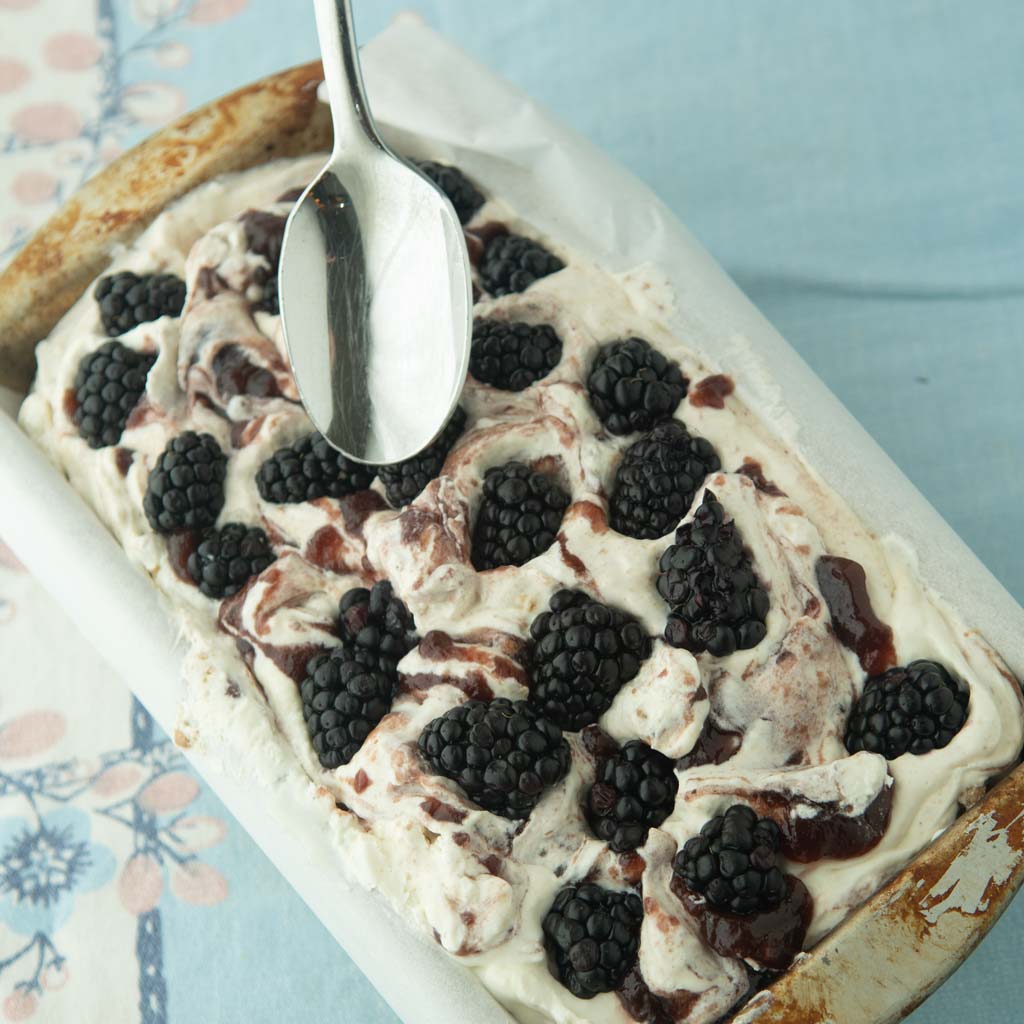
- Blackberry Crumble Ice Cream
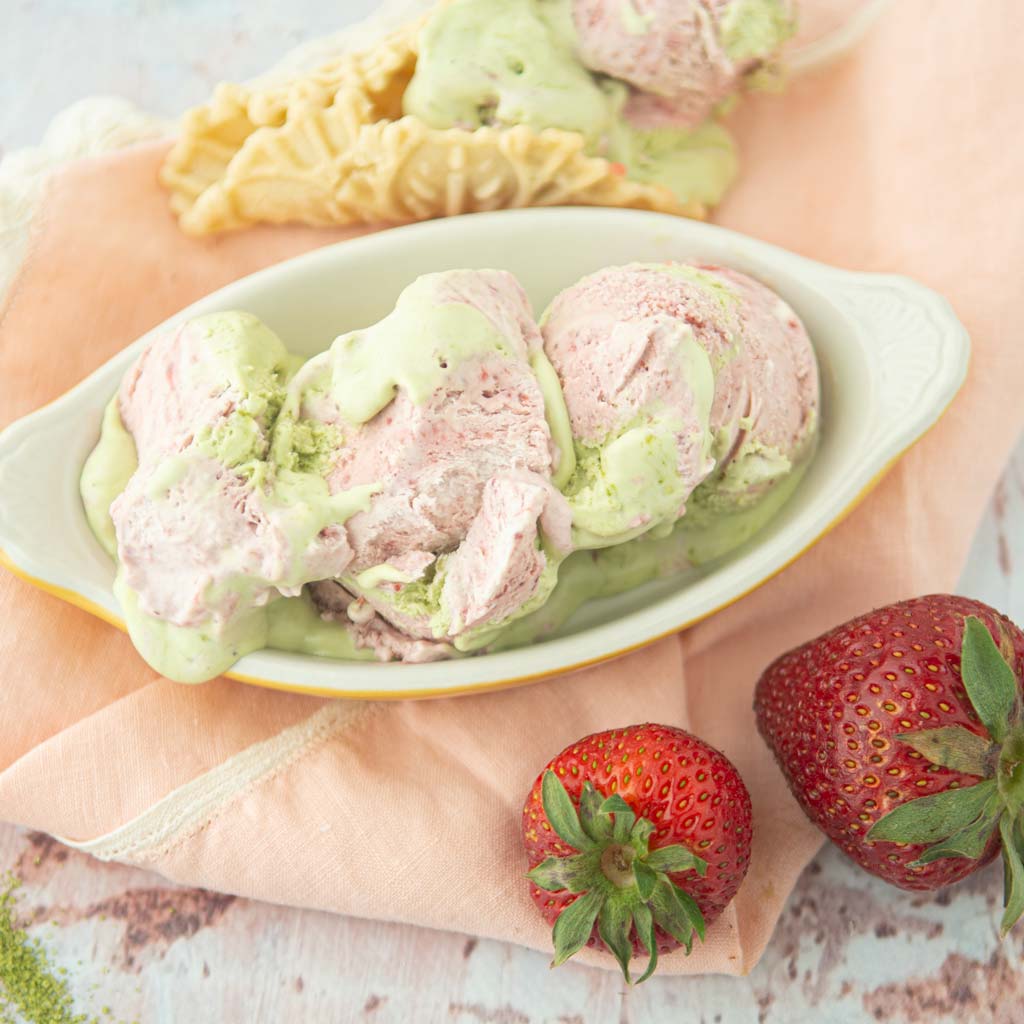
- Strawberry Matcha Ice cream
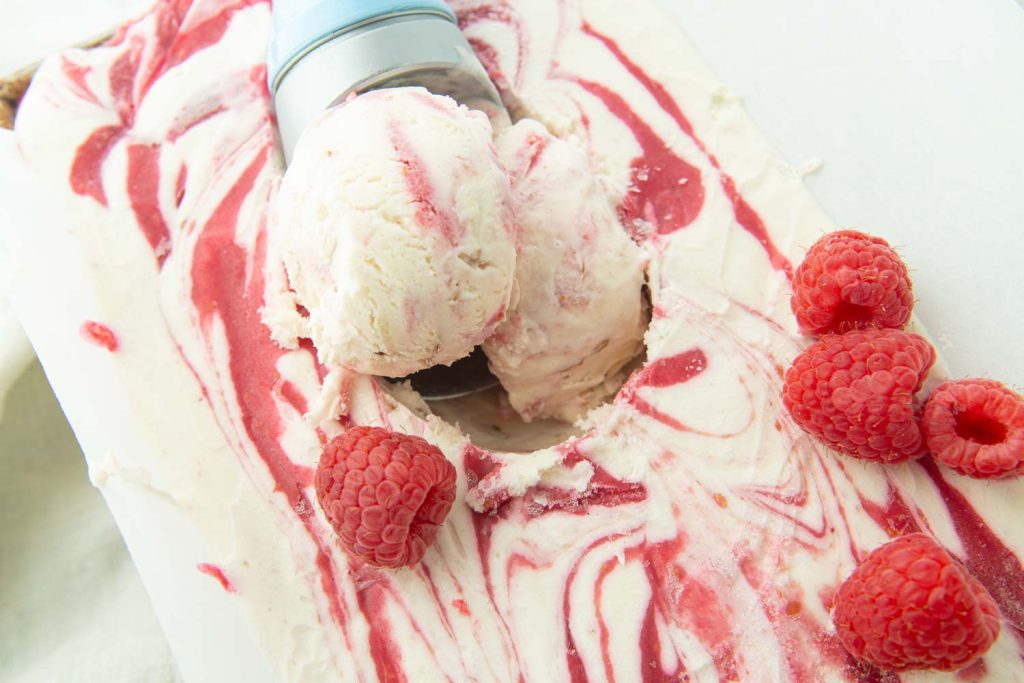
- Raspberry Swirl Ice Cream
- Pumpkin Ice Cream: If you make this pie for Fall, this ice cream is perfect. The pumpkin gives it a pure Fall touch and the warm spices go so well with the berries.
Tips for making a gorgeous American flag slab pie
- Use parchment !!!!!: If you can, buy parchment in precut sheets that fit your sheet pans. For this pie, this is tremendously helpful because the paper gives you a guide for cutting the pastry. You don’t have to bust out rulers or worry about transferring the dough. Literally lift up the parchment and put it in the pan. Similarly, you can create a template for the flag design right on another piece of paper (you do need a ruler here.).
- Keep paper towels handy: The pastry will get a little bit of the berry juice on the backside of the stripes as you cut half of them away (where the red stripes would go on the real flag). You’ll need that extra pastry to make the braided edge for the top of the pie. Keep a couple paper towels next to your pie and lay the strips down as you cut. This way the excess juice will get absorbed, leaving just enough for the pastry to stick to the pie when you finish the edge.
American Flag Slab Pie
- Total Time: 2 hours 25 minutes
- Yield: 20 large slices 1x
Description
Made in a sheet tray, this pie easily feeds 20 people generously or more making it the perfect pie for summer backyard BBQs, 4th of July, or church picnic. The extra flaky cream cheese pastry as the base is the perfect tangy foil to the rich floral notes of the berries!
Ingredients
Cream Cheese Pastry (double batch)
- 4 cups flour (520 g)
- 16 oz cream cheese (454 g)
- 4 sticks butter, frozen (454 g)
Mixed berry filling
- 3 pounds mixed berries; frozen is totally fine here
- 1 cup granulated sugar (200 g)
- 2/3 cup all-purpose flour (87 g)
- 1 Tablespoon lemon juice
- 1/2 teaspoon chai spice blend or ground cinnamon
Finishing the pie
- 1 egg
- 1 Tablespoon granulated sugar
Equipment
- 1/2 sheet pan
- Parchment (precut 1/2 size sheets are so helpful here, but use what you have)
- Rolling pin
- Star cookie cutter
- Paring knife
- Pastry brush
- Ruler + pencil
Instructions
Make the pie dough
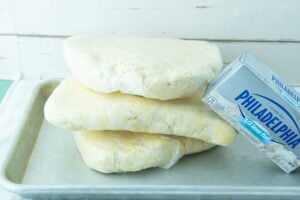
- Make the cream cheese pastry according to the cream cheese pastry recipe. Because you need a double batch of dough, work in the biggest bowl you have and use a giant piece of plastic wrap to form the dough.
- Divide the dough into 2 rounds, wrapping them in plastic to chill for at least 30 minutes before making your pie. You can do this up to 3 days ahead of time, or freeze the dough for when you need it.

Make the filling
- Toss the berries with the rest of the ingredients.

- You can let the berries sit out at room temperature to thaw while you’re making the pastry, or put them in a 350 F oven for about 10 minutes on a sheet tray if you want things to move a little faster.


Roll out the dough
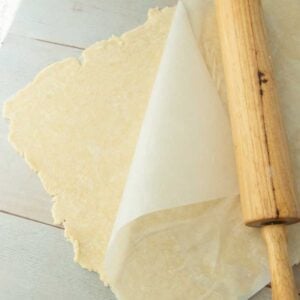
- Set half the dough on a piece of lightly-floured parchment paper. If you have precut half-sized sheets of parchment, this is so easy. If not, set a piece of parchment off your roll in your baking sheet and cut it to the size of the bottom of the pan.
- Sprinkle a little more flour over the top of the parchment. Place a second piece of parchment over the dough and then roll out the dough between the parchment layers into one sheet the size of the parchment. Pull the dough to the end of the counter and use your hip to anchor it in place while you roll if you don’t have someone who can hold the edges while you roll.
- If you have some pieces of dough hanging off the edge, you can cut them off and stick them to the places where the parchment might not make it to the edges. Keep on rolling until the dough covers the entire bottom piece of parchment.
- Peel off the top layer of parchment and set the rolled out dough into a half-size baking sheet.
- Roll the second half of dough the same way. If there is any leftover dough hanging off the edges of the parchment, cut it off into strips and then use the strips to line the sides of the baking sheet. You probably won’t have enough to finish covering the sides quite yet, but we’ll fix that in the next step. This is the top crust.
- Set the pan of dough in the fridge while you make the template for the top of the pie. Place the top crust in the freezer (this will make cutting easier).
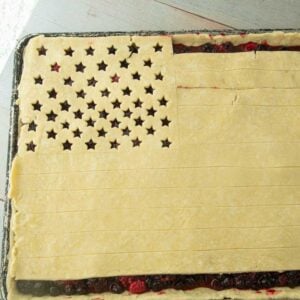
Make the American flag template
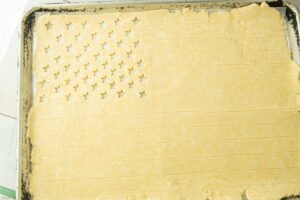
- Use a ruler and pencil to make a rectangular field for the stars and all the horizontal stripes on another piece of parchment.
- Ideally, the field for the stars should end at the bottom of the 4th red stripe, but a size of half-sized parchment is not quite the right aspect ratio for a proper flag, so mine is only at the bottom of the 3rd. Probably no one will notice, but here I am telling on myself.
- The stripes work out to needing to be about 7/8” or a tiny bit wider to fit all 13 stripes on the sheet.
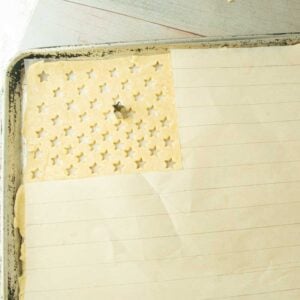
Prepping the top crust for cutting the design
-
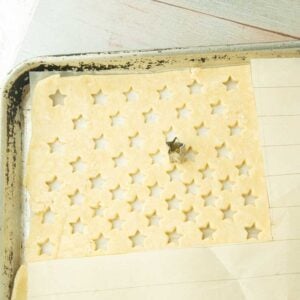
- Cut away the parchment in the star field with scissors. Place the template on the top crust, lining up the edges. Use a knife to lightly mark where the star field edges are.
- Fold the paper on the lines one at a time and lightly score along the edge of each line, using the folded edge as your guide. Be sure not to cut through the dough completely at this point or it will be difficult to transfer the design to the whole pie.
- Use a star cookie cutter to cut away dough in the star field. I’m using a tiny micro cutter, so I was able to cut out all 50 stars. Whatever size cutter you have, just cut out as many stars as looks good to you.
- Use the dough from both of these stripes to finish covering the sides of the sheet pan. Press the sides into the bottom, leaving no gaps.
Fill the pie
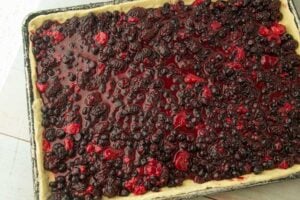
- Stir the berry filling with a slotted spoon. Drain the berries with the spoon and scatter them over the dough in the sheet tray.
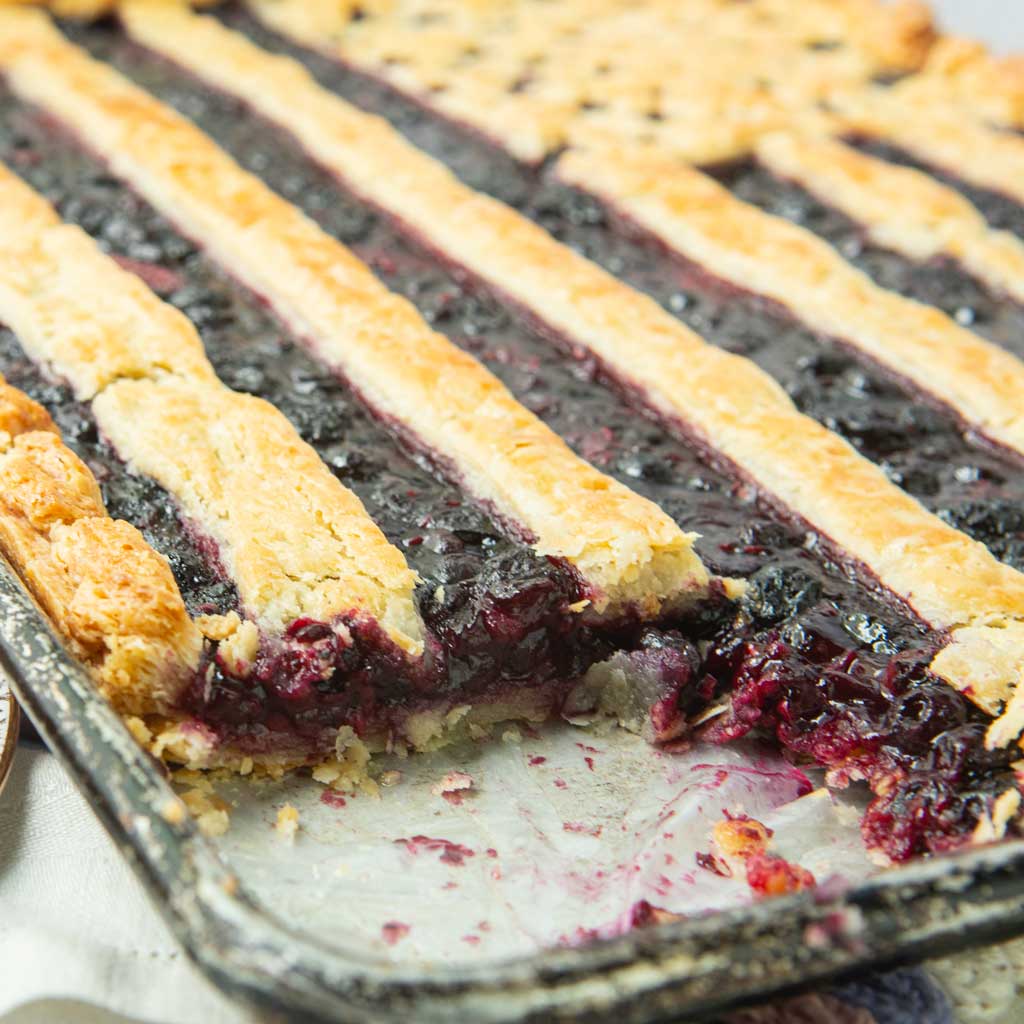
- While the flour in the filling will thicken the juices, I like to pour the juices on last in case they look a little too juicy. It’s up to you if you want all of the berry juice in your pie, but I usually leave out about 1/3 cup of juice just in case there are leaks anywhere in the crust.
- Preheat the oven to 375 F (190 F).
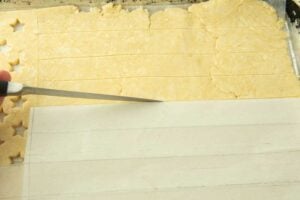
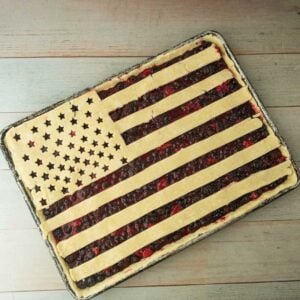
Finish the crust design
- Cut away the top stripe and the bottom stripe, laying the pastry aside for the moment. Flip the top crust face down on your counter. Top it with another piece of parchment and then flip it over again close to the pie, peeling away a little bit of parchment at a time as you transfer the top crust to cover the pie.
- Have a few paper towels next to your work space. Cut away the additional stripes (every other one from the top down to the bottom). Set the cut away pieces on the paper towels to absorb excess berry juice.
- Beat the egg with a teaspoon of water in a cup and set it near the pie.
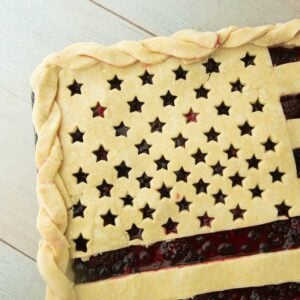
- Cut each extra piece of dough in half vertically and lay the skinny strips over each other to make a 2-strand braid. Be sure to do this in such a way that you don’t see the berry juices. Set the braid on the edges of the pie to cover the sides.
- The dough will probably be moist enough from the berry juice that you can simply press down on the braid to adhere it to the top of the pie. If it’s not, brush the edge with a little bit of the egg wash before you stick the braid in place.
- Keep braiding pieces of dough enough to cover the sides of the pan all the way around. Overlap pieces as you go.
- Brush the pastry with the egg wash and then sprinkle it with the sugar.

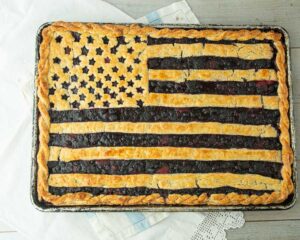
- Bake the pie for 50-55 minutes until the pastry is golden brown and crisp. Let the pie cool slightly before cutting it into 20 (or more) slices.
- The pie is best eaten the day you make it, but you can cover it with foil and keep it at room temp for up to 5 days. Reheat the pie straight in the pan at 300 F to warm it up and bring back some of the crispness to the pastry.


Notes
Fresh vs. frozen: Fresh or frozen berries are good here, but I personally love the convenience of frozen berries since you can use them year-round. I tend to make this pie when we have multiple ends of bags of frozen berries from Costco. If you find wonderful berries at a berry patch or you have fresh berries from your backyard, by all means use them. Take off any green bits or woody parts (save them for tea!). Wash the berries well and set them on paper towels or kitchen towels to dry them well before you mix them with the other filling ingredients.
- Prep Time: 45 minutes
- +30 minutes chilling:
- Cook Time: 50 minutes
- Category: Pies
- Method: Oven
- Cuisine: American